


Friday, November 27, 2015
Sunday, February 22, 2015
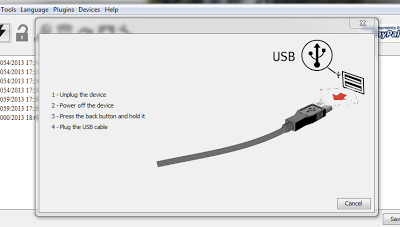
How to Root Sony Xperia L (C2104/C2105) Jelly Bean 4.1.2 [Build 15.0.A.1.31/15.0.A.1.36]

So Finally an easy rooting method is available for Xperia L
(C2104/C2105) Jelly Bean [Build 15.0.A.1.31/15.0.A.1.36] . Thanks to DooMLoRD for the root method.
To root the latest Jelly Bean 4.2.2 Build 15.3.A.0.26, READ THIS.
Disclaimer : I am not responsible if you brick your phone or if u make any other damage to your phone
To root the latest Jelly Bean 4.2.2 Build 15.3.A.0.26, READ THIS.
Disclaimer : I am not responsible if you brick your phone or if u make any other damage to your phone
So Lets Start :
1. First of all make sure, your Build number is 15.0.A.1.31 OR 15.0.A.1.36 . Go to Settings > About phone to verify this
2. Download This File - DooMLoRD_Easy-Rooting-Toolkit_v17_perf-event-exploit and extract it completely using WinRAR or WinZip.
3. Enable USB debugging from Settings > Developer Options.
4. Enable Unknown sources from Settings > Security
5. [Optional] Increase screen timeout to 10 minutes
6. Connect USB Cable to phone , then connect it to your Computer.
7. Now go to the Folder where you extracted the downloaded file from Step 2, and execute "runme_win.bat"
Note :- This toolkit works on Windows , Linux as well as MAC , Linux users Run "runme_linux.sh" and MAC users Run "runme_mac.sh".
8. Read and Follow the instructions on the screen!
9. REBOOT THE DEVICE AFTER THE SCRIPT HAS FINISHED EXECUTION!!!
Note : This method works on both locked and unlocked bootloader devices!!!
If you have any problems feel free to comment :)
Source - XDA
How to Install JellyBean (6.2.A.1.100) on Sony Xperia P
Disclaimer : I am not responsible if you brick your phone or if u make any other damage to your phone
Step 1 : First of all download this ftf File from here - DOWNLOAD LINK
Step 2 :
- Download Flashtool from the official website - http://androxyde.github.io/
- Install it on your PC using onscreen instructions.It will create a folder "Flashtool" in your drive(C\Flastool)
- Now go to C\Flastool\drivers\flastool-drivers.exe and click on it and install it after marking/checking "xperia p,xperia u,xperia sola drivers" which is below there on the list
- Restart your PC
Note: Make sure you have USB debugging on. If not goto setting>developer options> and check USB debugging on
Step 3 : Now place the downloaded ftf file to C:/Flashtool/firmwares/

Step 4 : Now open Flashtool from the Start Menu
Step 5 : Now click on the FLASH icon of the flashtool which is on the left side of the iconic tab(below the 'file' option-it's like a lightning sign).a window will be opened Mode Selector. Check "FlashMode" and press "ok" button.

Step 6 : Now Select the Firware file which you had placed in C:/Flashtool/firmwares/ in Step 3
Step 7 : A Dialogue Box will appear just click on OK

Step 8 : Now the flashtool will prepare files for flashing and then you will be prompted to connect phone in flashmode.
Step 9 :
- Now Power Off your phone and wait for 5 Seconds, then Connect your phone to PC using USB cable while pressing volume down button (-) (Make sure you dont release Volume down button until flashtool starts flashing)
- Flashtool will start flashing firmware it may take some time.
- After flashing flashtool will prompt you to disconnect you phone. Discconet it and power on your phone (It may take some time for the first boot).
- Enjoy the Official Jelly Bean
Android 4.3 Google Edition Camera App [ No Root Required]
Here's the camera (and gallery) app from the Google Edition phones,
which lets you record and view Photosphere images. The UI has been modified!
It works perfectly on Jelly Bean 4.1.2 and 4.2.2, many users have also reported that it works on ICS also.
Instructions :-
Here is the Download Link - Click Here
Screenshots :-


Enjoy, If you have any problem feel free to comment
It works perfectly on Jelly Bean 4.1.2 and 4.2.2, many users have also reported that it works on ICS also.
Instructions :-
- Just install this as a normal apk , download the file and copy it in you phone and install it ( No Root is required).
- It is also recommended to backup your old camera app.
- This app wont delete your existing camera app.
Here is the Download Link - Click Here
Screenshots :-
Enjoy, If you have any problem feel free to comment
How to Install ClockworkMod Recovery (CWM) on Sony Xperia P [ICS and JB]
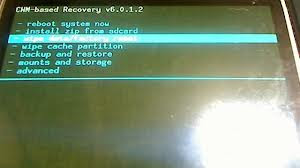
What is CWM? For taking Nandroid Backups, flashing zip files, if you caught in bootloops due to something wrong flashed WITHOUT backup of your important data, you can go for backup in TAR format from CWM Recovery and later on, extract the tar data and put in Titanium Backup to get it back... (YOU CAN'T USE WHOLE BACKUP THAT HAVE BEEN TAKEN AFTER BOOTLOOPS)
Thanks to atis112 for the Recovery.
Disclaimer : I am not responsible if you brick your phone or if u make any other damage to your phone
Note : This works on both locked and unlocked bootloader devices!!!
REQUIREMENTS :-
1. Stock ICS / JellyBean ROM
2. Root (Instructions to Root Jelly Bean Click Here)
INSTRUCTIONS :-
1. Download this zip package - CWM Recovery 6.0.1.2
2. Extract the zip file.
3. Enable USB debugging from Settings > Developer Options.
4. Enable Unknown sources from Settings > Security
5. Connect your phone to your Computer.
6. Click on install.bat and follow the onscreen instructions.
HOW TO USE :-
1. Power Off your Phone.
2. Power On your Phone.
3. Press the Volume Down Button when you see the Sony Logo ( Tap the Volume Down 2-3 Times )
Source - LINK
How to Root Sony Xperia P / Xperia Go on 4.1.2 Jelly Bean [Build 6.2.A.1.100]

So Finally an easy rooting method is available for Xperia P and Go Jelly Bean [Build 6.2.A.1.100]. Thanks to DooMLoRD for the root method.
Disclaimer : I am not responsible if you brick your phone or if u make any other damage to your phone
Disclaimer : I am not responsible if you brick your phone or if u make any other damage to your phone
So Lets Start :
1. First of all make sure, your Build number is 6.2.A.1.100. Go to Settings > About phone to verify this
2. Download This File - DooMLoRD_Easy-Rooting-Toolkit_v17_perf-event-exploit and extract it completely using WinRAR or WinZip.
3. Enable USB debugging from Settings > Developer Options.
4. Enable Unknown sources from Settings > Security
5. [Optional] Increase screen timeout to 10 minutes
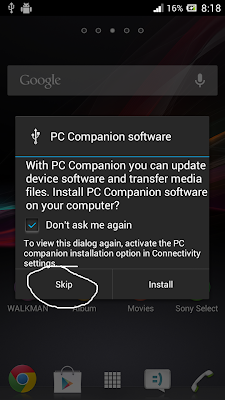
6. Connect USB Cable to phone , then connect it to your Computer. On your phone Skip the PC Companion Companion prompt (if it appears), see screenshot below.
7. Now go to the Folder where you extracted the downloaded file from Step 2, and execute "runme_win.bat" (Windows User)
Note :- This toolkit works on Windows , Linux as well as MAC , Linux users Run "runme_linux.sh" and MAC users Run "runme_mac.sh".

8. Read and Follow the instructions on the screen!
9. REBOOT THE DEVICE AFTER THE SCRIPT HAS FINISHED EXECUTION!!!
Note : This method works on both locked and unlocked bootloader devices!!!
If you have any problems feel free to comment :)
Source - XDA
How to Root LG Google Nexus 5 ( hammerhead ) on Android 5.0 Lollipop
Android 5.0 Lollipop was released for Nexus 5 , here is the tutorial to root your Google Nexus 5 aka hammerhead.

Disclaimer : I am not responsible if you brick your phone or if u make any other damage to your phone, this method will unlock your bootloader and wipe your data so backup all your data and proceed.
So Lets Start :
1. First make sure you are running Android Lollipop 5.0 . Go to Settings > About to verify this.

2. Connect USB Cable to phone , then connect it to your Computer. Now open Device Manager , Right Click My Computer > Manage > Device Manager , make sure you have ADB Drivers installed, if it is installed you will see Android Device Listed, see below screenshot.
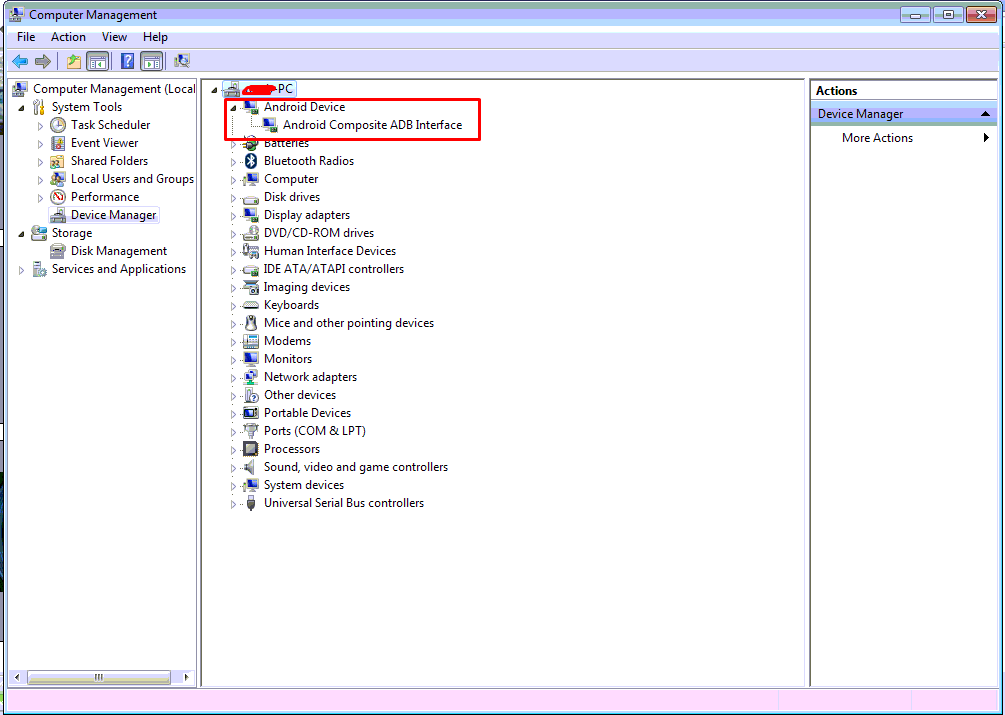
NOTE :- If you dont have ADB Drivers installed download the drivers from here - http://developer.android.com/sdk/win-usb.html
Extract the file.
If the drivers are not installed you will see exclamation mark in Yellow triangle , right click on it Select Update Driver Software > Browse my Computer for driver software , now select the location of the file u downloaded and extracted from the above link.
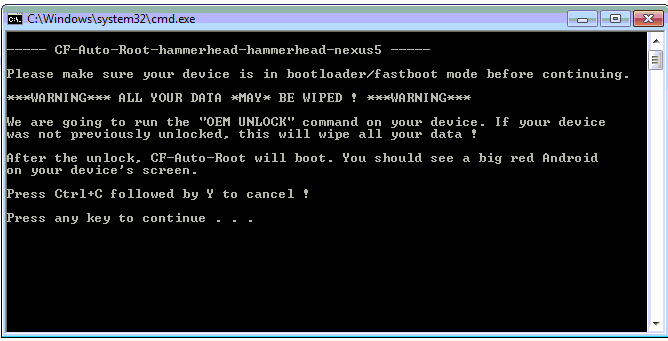
3. Download this file - CF-Auto-Root-hammerhead-hammerhead-nexus5.zip and extract it completely
4. Disconnect your phone , Power off the phone , now Press and Hold Volume Down, Volume Up and Power simultaneously. You will see Fastboot mode in your mobile , connect your phone to your computer now.
5. Now goto the folder where u extracted CF-Auto-Root-hammerhead-hammerhead-nexus5.zip and run "root-windows.bat" , the rooting process will start ( if your device is properly connected in fastboot mode) , your device will reboot.
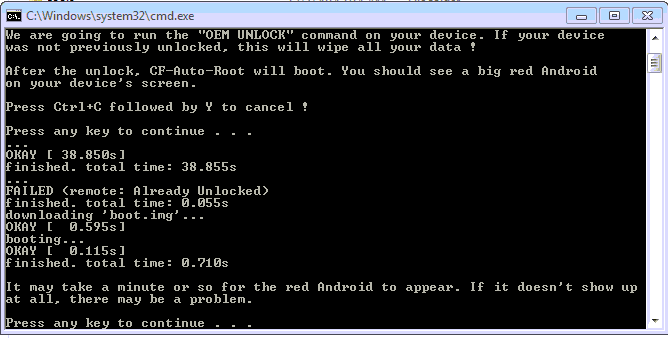
THATS IT YOUR PHONE IS NOW ROOTED.
If you have any problems feel free to comment :)
Disclaimer : I am not responsible if you brick your phone or if u make any other damage to your phone, this method will unlock your bootloader and wipe your data so backup all your data and proceed.
So Lets Start :
1. First make sure you are running Android Lollipop 5.0 . Go to Settings > About to verify this.
2. Connect USB Cable to phone , then connect it to your Computer. Now open Device Manager , Right Click My Computer > Manage > Device Manager , make sure you have ADB Drivers installed, if it is installed you will see Android Device Listed, see below screenshot.
NOTE :- If you dont have ADB Drivers installed download the drivers from here - http://developer.android.com/sdk/win-usb.html
Extract the file.
If the drivers are not installed you will see exclamation mark in Yellow triangle , right click on it Select Update Driver Software > Browse my Computer for driver software , now select the location of the file u downloaded and extracted from the above link.
3. Download this file - CF-Auto-Root-hammerhead-hammerhead-nexus5.zip and extract it completely
4. Disconnect your phone , Power off the phone , now Press and Hold Volume Down, Volume Up and Power simultaneously. You will see Fastboot mode in your mobile , connect your phone to your computer now.
5. Now goto the folder where u extracted CF-Auto-Root-hammerhead-hammerhead-nexus5.zip and run "root-windows.bat" , the rooting process will start ( if your device is properly connected in fastboot mode) , your device will reboot.
THATS IT YOUR PHONE IS NOW ROOTED.
If you have any problems feel free to comment :)
How to Root Sony Xperia Z1 ( C6902 / C6903 / C6906 / C6943 ) 4.4.4 KitKat Build [14.4.A.0.157]

Sony released a new update for Xperia Z1 Build 14.4.A.0.157 with some bug fixes aand here is the tutorial to root the latest firmware :D . This tutorial is only for Build 14.4.A.0.157 , will work on all models of Xperia Z1 i.e C6902, C6903, C6909, C6943 :)
To Root any older Build version of Xperia Z1 CLICK HERE
Disclaimer : I am not responsible if you brick your phone or if u make any other damage to your phone
So Lets Start :
1. First make sure you are running KitKat 4.4.4 Build 14.4.A.0.157. Go to Settings > About to verify this. The below screenshot is of C6902 but the method will work on all models of Z1 running Build 14.4.A.0.157.
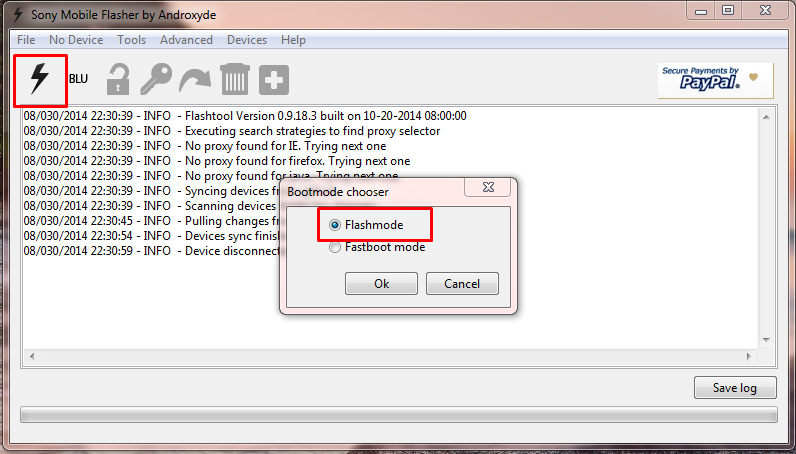
2. Download and install Flashtool from here - http://www.flashtool.net/downloads.php
3. Download these three files ( See this screenshot first - http://i.imgur.com/DgoqOIA.png )
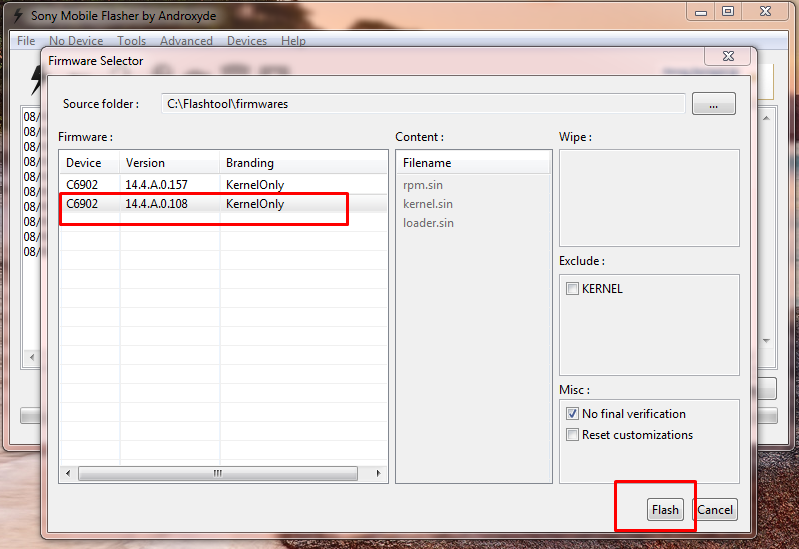
4. Copy C690X_14.4.A.0.108_KernelOnly.ftf and C690X_14.4.A.0.157_KernelOnly.ftf to C:\Flashtool\firmwares
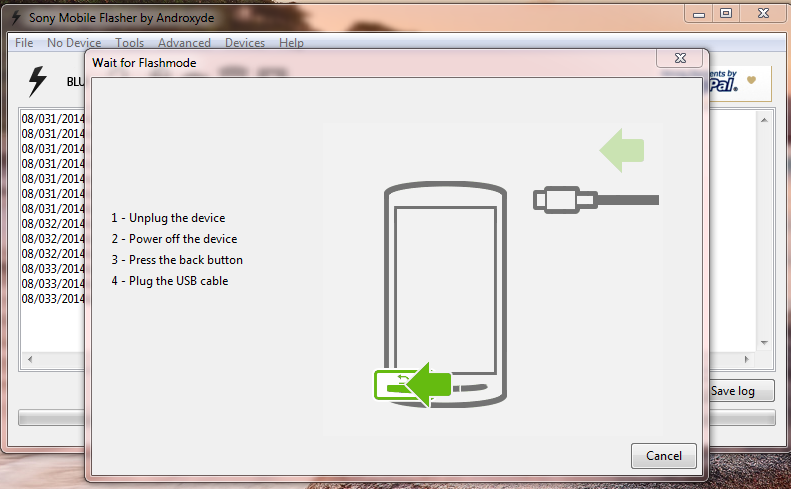
5. Run Flashtool and Flash C690X_14.4.A.0.108_KernelOnly.ftf ( See the screenshots below ) Press Volume down button and connect your phone to connect in Flash Mode.
6. Close Flashtool ( DO NOT SKIP THIS STEP )
7. Boot your device , and Connect Your Device to PC with USB Debugging Mode On , go to Settings > Developer Options to enable it. Also Enable Unknown Sources. Go to Settings > Security and check Unknown sources.
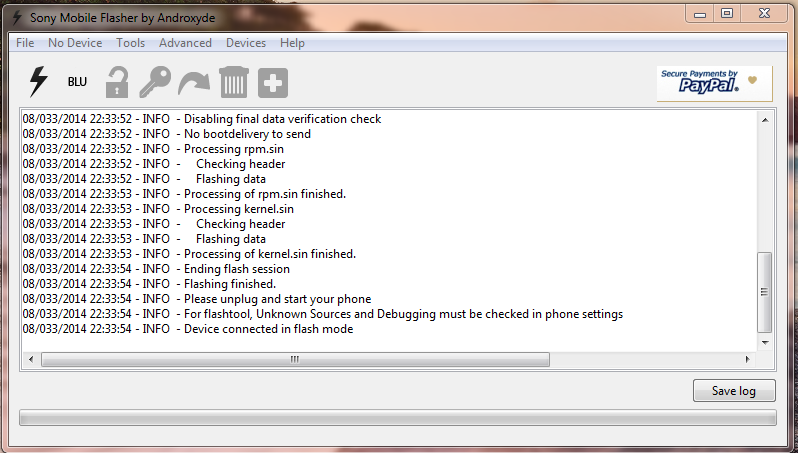
8. Extract rootkitXperia_20140719.zip and execute install.bat , the rooting process will start and your device will reboot ( For more instructions on this step refer this - http://www.waledacdroid.com/2014/11/how-to-root-sony-xperia-z1-c6902-c6903.html )
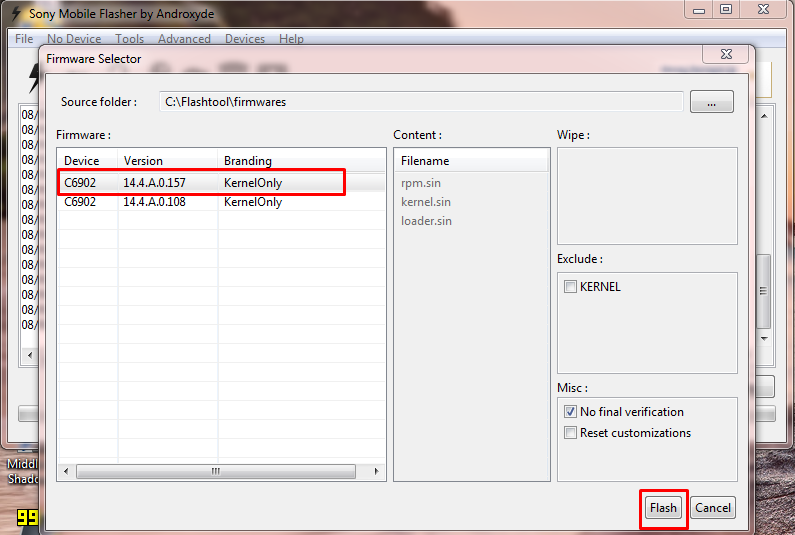
9. Now Power Off your phone and Flash the C690X_14.4.A.0.157_KernelOnly.ftf using Flashtool. Press Volume Down button and connect your phone to PC to connect in Flashmode.
10. Wait for flashing to finish , disconnect your phone from PC and boot your phone.
THATS IT YOUR PHONE IS NOW ROOTED.
Note : This method works on both locked and unlocked bootloader devices!!!
If you have any problems feel free to comment :)
How to Root / Unroot Xiaomi Redmi 1S ( armani ) running Android Jelly Bean 4.3 ( MIUI 5 - MIUI-JHCMIBH45.0 )
Here is the tutorial for rooting and unrooting Xiaomi Redmi 1S running Android Jelly Bean 4.3 , MIUI 5 - MIUI-JHCMIBH45.0

Disclaimer : I am not responsible if you brick your phone or if u make any other damage to your phone
You can use the same method to root any other older version also :)
Rooting :
1. First make sure you are running the same build i.e Android 4.3 , MIUI Version : MIUI-JHCMIBH45.0. Goto Settings > About to verify this.
2. Download this File - update.zip and copy it to the root of your Internal Storage.
3. Enable USB Debugging , Go to Settings > About phone and tap 5 times on Android Version to enable Developer option.
4. Reboot your phone to Recovery ( Open Updater app from Tools , Press the Menu / Options button and select Reboot to Recovery mode )
5. Now Select and confirm "Install update.zip to System" , this will take a few seconds. ( Use the Volume Up / Down to navigate and the Power Button to Select )

6. Now select and confirm Reboot. ( Reboot to System )
7. Open Security App , Select Permissions and Turn On the Root permission

THATS IT YOUR PHONE IS NOW ROOTED.
UnRooting :
1. Download this File - UnRoot Redmi 1S.zip , rename it to update.zip and copy it to the root of your Internal Storage.
2. Open Security App , Select Permissions and Turn OFF the Root permission

3. Reboot your phone to Recovery ( Open Updater app from Tools , Press the Menu / Options button and select Reboot to Recovery mode )
4. Now Select and confirm Install update.zip to System , this will take a few seconds.
5. Now Select and confirm Reboot. ( Reboot to System )
YOUR PHONE IS NOW UNROOTED.
If You Have Any Problems Feel Free To Comment :)
Disclaimer : I am not responsible if you brick your phone or if u make any other damage to your phone
You can use the same method to root any other older version also :)
Rooting :
1. First make sure you are running the same build i.e Android 4.3 , MIUI Version : MIUI-JHCMIBH45.0. Goto Settings > About to verify this.
2. Download this File - update.zip and copy it to the root of your Internal Storage.
3. Enable USB Debugging , Go to Settings > About phone and tap 5 times on Android Version to enable Developer option.
4. Reboot your phone to Recovery ( Open Updater app from Tools , Press the Menu / Options button and select Reboot to Recovery mode )
5. Now Select and confirm "Install update.zip to System" , this will take a few seconds. ( Use the Volume Up / Down to navigate and the Power Button to Select )
6. Now select and confirm Reboot. ( Reboot to System )
7. Open Security App , Select Permissions and Turn On the Root permission
THATS IT YOUR PHONE IS NOW ROOTED.
UnRooting :
1. Download this File - UnRoot Redmi 1S.zip , rename it to update.zip and copy it to the root of your Internal Storage.
2. Open Security App , Select Permissions and Turn OFF the Root permission
3. Reboot your phone to Recovery ( Open Updater app from Tools , Press the Menu / Options button and select Reboot to Recovery mode )
4. Now Select and confirm Install update.zip to System , this will take a few seconds.
5. Now Select and confirm Reboot. ( Reboot to System )
YOUR PHONE IS NOW UNROOTED.
If You Have Any Problems Feel Free To Comment :)
How to Root / Unroot Xiaomi Redmi 1S ( armani ) running Android Jelly Bean 4.3 ( MIUI 5 - MIUI-JHCMIBH45.0 )
Here is the tutorial for rooting and unrooting Xiaomi Redmi 1S running Android Jelly Bean 4.3 , MIUI 5 - MIUI-JHCMIBH45.0
Disclaimer : I am not responsible if you brick your phone or if u make any other damage to your phone
You can use the same method to root any other older version also :)
Rooting :
1. First make sure you are running the same build i.e Android 4.3 , MIUI Version : MIUI-JHCMIBH45.0. Goto Settings > About to verify this.
2. Download this File - update.zip and copy it to the root of your Internal Storage.
3. Enable USB Debugging , Go to Settings > About phone and tap 5 times on Android Version to enable Developer option.
4. Reboot your phone to Recovery ( Open Updater app from Tools , Press the Menu / Options button and select Reboot to Recovery mode )
5. Now Select and confirm "Install update.zip to System" , this will take a few seconds. ( Use the Volume Up / Down to navigate and the Power Button to Select )
6. Now select and confirm Reboot. ( Reboot to System )
7. Open Security App , Select Permissions and Turn On the Root permission
THATS IT YOUR PHONE IS NOW ROOTED.
UnRooting :
1. Download this File - UnRoot Redmi 1S.zip , rename it to update.zip and copy it to the root of your Internal Storage.
2. Open Security App , Select Permissions and Turn OFF the Root permission
3. Reboot your phone to Recovery ( Open Updater app from Tools , Press the Menu / Options button and select Reboot to Recovery mode )
4. Now Select and confirm Install update.zip to System , this will take a few seconds.
5. Now Select and confirm Reboot. ( Reboot to System )
YOUR PHONE IS NOW UNROOTED.
If You Have Any Problems Feel Free To Comment :)
How to Update Xiaomi Mi3 ( cancro ) to Android 4.4.4 ( MIUI KXDMIBH32.0 )
Xiaomi released an update for Mi3 / Mi3W International version , MIUI Version - KXDMIBH32.0 .
Here is the tutorial to manually update your phone to the latest Stable rom ( Android 4.4.4 ) , using this method you wont loose any data / application. But it is better to backup in case something goes wrong. Goto Settings > Backup & reset > Local backups to backup your applications/contacts.
Disclaimer : I am not responsible if you brick your phone or if u make any other damage to your phone
To Root the latest MIUI Version : KXDMIBH32.0 ( Android 4.4.4 ) CLICK HERE
1. Download this File - Mi3 KXDMIBH32 Android 4.4.4 and copy it to the root of your Internal Storage.
2. Now in your mobile go to Tools and Open Updater , Press the Menu Button (left corner button) and now click on Select Select Update Package and select the miui_MI3WMI4WGlobal_KXDMIBH32.0_3bd1a98781_4.4.zip which u saved in the Internal Storage.

3. Now Click on Update , wait for few minutes , when the update is completed , you will be prompted to reboot , click on Reboot to finish.


4. Congrats your phone is now updated to the latest version of MIUI 5 ( Android 4.4.4 )

If You Have Any Problems Feel Free To Comment :)
Here is the tutorial to manually update your phone to the latest Stable rom ( Android 4.4.4 ) , using this method you wont loose any data / application. But it is better to backup in case something goes wrong. Goto Settings > Backup & reset > Local backups to backup your applications/contacts.
Disclaimer : I am not responsible if you brick your phone or if u make any other damage to your phone
To Root the latest MIUI Version : KXDMIBH32.0 ( Android 4.4.4 ) CLICK HERE
1. Download this File - Mi3 KXDMIBH32 Android 4.4.4 and copy it to the root of your Internal Storage.
2. Now in your mobile go to Tools and Open Updater , Press the Menu Button (left corner button) and now click on Select Select Update Package and select the miui_MI3WMI4WGlobal_KXDMIBH32.0_3bd1a98781_4.4.zip which u saved in the Internal Storage.
3. Now Click on Update , wait for few minutes , when the update is completed , you will be prompted to reboot , click on Reboot to finish.
4. Congrats your phone is now updated to the latest version of MIUI 5 ( Android 4.4.4 )
If You Have Any Problems Feel Free To Comment :)
How to Root / Unroot Xiaomi Redmi 1S ( armani ) running Android Jelly Bean 4.3 ( MIUI 5 - MIUI-JHCMIBH45.0 )
Here is the tutorial for rooting and unrooting Xiaomi Redmi 1S running Android Jelly Bean 4.3 , MIUI 5 - MIUI-JHCMIBH45.0
Disclaimer : I am not responsible if you brick your phone or if u make any other damage to your phone
You can use the same method to root any other older version also :)
Rooting :
1. First make sure you are running the same build i.e Android 4.3 , MIUI Version : MIUI-JHCMIBH45.0. Goto Settings > About to verify this.
2. Download this File - update.zip and copy it to the root of your Internal Storage.
3. Enable USB Debugging , Go to Settings > About phone and tap 5 times on Android Version to enable Developer option.
4. Reboot your phone to Recovery ( Open Updater app from Tools , Press the Menu / Options button and select Reboot to Recovery mode )
5. Now Select and confirm "Install update.zip to System" , this will take a few seconds. ( Use the Volume Up / Down to navigate and the Power Button to Select )
6. Now select and confirm Reboot. ( Reboot to System )
7. Open Security App , Select Permissions and Turn On the Root permission
THATS IT YOUR PHONE IS NOW ROOTED.
UnRooting :
1. Download this File - UnRoot Redmi 1S.zip , rename it to update.zip and copy it to the root of your Internal Storage.
2. Open Security App , Select Permissions and Turn OFF the Root permission
3. Reboot your phone to Recovery ( Open Updater app from Tools , Press the Menu / Options button and select Reboot to Recovery mode )
4. Now Select and confirm Install update.zip to System , this will take a few seconds.
5. Now Select and confirm Reboot. ( Reboot to System )
YOUR PHONE IS NOW UNROOTED.
If You Have Any Problems Feel Free To Comment :)
Disclaimer : I am not responsible if you brick your phone or if u make any other damage to your phone
You can use the same method to root any other older version also :)
Rooting :
1. First make sure you are running the same build i.e Android 4.3 , MIUI Version : MIUI-JHCMIBH45.0. Goto Settings > About to verify this.
2. Download this File - update.zip and copy it to the root of your Internal Storage.
3. Enable USB Debugging , Go to Settings > About phone and tap 5 times on Android Version to enable Developer option.
4. Reboot your phone to Recovery ( Open Updater app from Tools , Press the Menu / Options button and select Reboot to Recovery mode )
5. Now Select and confirm "Install update.zip to System" , this will take a few seconds. ( Use the Volume Up / Down to navigate and the Power Button to Select )
6. Now select and confirm Reboot. ( Reboot to System )
7. Open Security App , Select Permissions and Turn On the Root permission
THATS IT YOUR PHONE IS NOW ROOTED.
UnRooting :
1. Download this File - UnRoot Redmi 1S.zip , rename it to update.zip and copy it to the root of your Internal Storage.
2. Open Security App , Select Permissions and Turn OFF the Root permission
3. Reboot your phone to Recovery ( Open Updater app from Tools , Press the Menu / Options button and select Reboot to Recovery mode )
4. Now Select and confirm Install update.zip to System , this will take a few seconds.
5. Now Select and confirm Reboot. ( Reboot to System )
YOUR PHONE IS NOW UNROOTED.
If You Have Any Problems Feel Free To Comment :)
Subscribe to:
Posts (Atom)


