BEST Computer Centre

BEST Computer Centre မွ ႀကိဳဆိုပါသည္။

အမွတ္ (၁၇၉)၊ မဂၤလာလမ္း၊ ေၾကာင္ငယ္ရပ္၊ ၿမိတ္ၿမိဳ႕။ ဖုန္း - ၀၅၉ ၄၂ ၉၇၀၊ ၀၅၉ ၄၂ ၅၀၆

BEST Computer Centre

BEST Computer Centre မွ ႀကိဳဆိုပါသည္။

အမွတ္ (၁၇၉)၊ မဂၤလာလမ္း၊ ေၾကာင္ငယ္ရပ္၊ ၿမိတ္ၿမိဳ႕။ ဖုန္း - ၀၅၉ ၄၂ ၉၇၀၊ ၀၅၉ ၄၂ ၅၀၆

BEST Computer Centre

BEST Computer Centre မွ ႀကိဳဆိုပါသည္။

အမွတ္ (၁၇၉)၊ မဂၤလာလမ္း၊ ေၾကာင္ငယ္ရပ္၊ ၿမိတ္ၿမိဳ႕။ ဖုန္း - ၀၅၉ ၄၂ ၉၇၀၊ ၀၅၉ ၄၂ ၅၀၆

BEST Computer Centre

BEST Computer Centre မွ ႀကိဳဆိုပါသည္။

အမွတ္ (၁၇၉)၊ မဂၤလာလမ္း၊ ေၾကာင္ငယ္ရပ္၊ ၿမိတ္ၿမိဳ႕။ ဖုန္း - ၀၅၉ ၄၂ ၉၇၀၊ ၀၅၉ ၄၂ ၅၀၆

Showing posts with label Android Tool. Show all posts

Friday, March 18, 2016

15 Tips and Tricks to make Android phone / tablet faster speedy

Here are 15 best tips and tricks to make any Android phone or tablet run faster with or without rooting. Know how to make your Android phone fast (speed up my phone). Android is the most popular Smartphone operating system in the world. Android phones / tablet comes at very cheap and expensive prices tags. If you are facing slow speed on your Android phone, we have some of the best tips and tricks to make your Android phone super fast with or without rooting. By applying these methods on your android phone, you will get faster and smoother android experience.

Before talking about the tips and tricks to make the android faster, let’s know “Why my Android Smartphone is Slow?”. Below are some reasons which make the android slower:
  • Bad memory management
  • Virus
  • LOW RAM / Main Memory
  • Insufficient Cache Memory
  • BUGS in the Operating System ROM / Custom ROM
  • Programs or APPS running in the background
  • Processor load
  • SLOW microSD card / external memory card

How to make Android phone or tablet faster

As far as till now we can’t recommend any hardware upgrade to Android phones, unlike desktop computers and desktops. The only thing which we all can upgrade in smartphones in external Micro SD card with great speed (Class 10). By upgrading the SD card, the apps which are installed on it will load up quickly.Tips and Tricks to make Android phone OR tablet faster speed

Make Android phone or tablet faster without root

Install System Firmware updates
Make sure your system is up to date. Check for System firmware updates for your phone. To check updates on the phone, Open Settings, scroll down to About Device. Now Touch on Software update andcheck for updates.

Set static image as Wallpaper, instead of Live Wallpaper

Turn off the Live Wallpaper on the home screen and set a static image as Wallpaper. It will not just improve the performance of the phone but also the battery life / backup of the phone.

Delete / Uninstall All the Apps which you don’t use anymore

Delete all the Applications which you don’t use anymore. Remove all the games which you don’t play any more etc. By deleting the apps there will increase in RAM, phone, and Cache memory. Also, try to delete the manufacturers / OEM pre-installed apps. If you are unable to do so, that means it requires the phone to be rooted.

Clear APPS Cached data

By clearing the Apps cache data,there will be a huge improvement in overall system performance. There are many other benefits of clearing App cache and data like, to remove errors caused by apps. The process to clear Apps cache and data is very simple in Android, go to “Settings”, open the Device Storage. Scroll down the list until you get the Cache Data entry, and touch on it. A pop will appear on the screen telling that you are able to out all cache data. Confirm it  and that it.

Turn off or Reduce transition Animation scale in Developer Options

You can the make the Android mobile fast and smooth by reducing the transition Animation scale. To turn off or reduce the transition Animation in Android go to Settings > Developer Options. Now touch on “Transition animation scale” set it “Animation is OFF” or scale it to 1X. Now reboot your phone.

Turn off or minimize auto-sync

We all use and add lots of Google Gmail and other email accounts to our Android devices. But, by allowing the to automatically synchronize in the background to notify about new updates not only uses internet data but also put the huge impact on the performance of the phone. To turn off the Auto-sync go to Settings, scroll down to Accounts and find Auto-sync. Now simply turn off it.

Try a simple yet Fast third-party launcher

The default OEM launcher in the Android tablets or phones are not fast and usually, make the system slow. So we recommend you to install a simple and fast launcher from Google Play Store. Make sure you install a good launcher, like ADW or any other.
Close the background running Apps
Close the apps which are running in the background. To close or stop the apps running in the background long press on the home button and then select and swipe left to close the apps. It makes currently using or opened app to load and run in faster and smoother way.

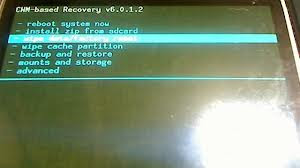
Wipe cache Partition and Perform Factory hard reset

If you are still struggling with slow speeds, then go to recovery and Wipe cache partition. It is a bit advance solution so procedure might vary little bit from device to device to go to recovery mode. If that doesn’t even works then you can perform Factory Hard reset in the last. Know how to factory hard reset android phone or tablet.tips to make android phone fast factory reset

Install and use third party browser

If the RAM on your phone is low,  you might face unexpectedly hanging, unexpectedly closing of the browser app. The solution to this problem is to install a fast third-party Internet browser.
Free Phone Memory
Free Phone’s internal and external SD card memory. Android OS stores cache on Phone memory / SD-card, like Gallery thumbnails. So, if there will be much free space available the user can  browse or explore the files efficiently.

Make Android phone or tablet faster with rooting

The below tips and tricks requires the phone to be rooted. Make sure you are Super-user to make changes in the Android OS.

Install a faster Custom ROM

Rooting your Android phone / tablet will only make you super user so that you can make changes to the system files. Rooting itself will not make the phone faster or snappy. There are nos of developments are going on XDA and other platforms for all smartphones. You can find custom ROM for you device and install it. Most of the custom ROMs offers tweaks and modification, which make the phone faster.
Delete OEM unused Apps
Delete the Apps which you don’t need. Make sure you don’t delete any system files. To delete the Apps go to Settings page, Touch on Manage Applications, Swipe to All and now touch the app you want uninstall.
This Tips and Tricks will work on all android phones including: Amoi, Archos, AT&T, BenQ, Bird, BLU, Casio, Celkon, Dell, Ericsson, Fujitsu,  Siemens, Gigabyte, Haier, HTC, i-mate, Icemobile, iNQ, Karbonn, Lava, LG, Maxwest, Micromax, Mitac, Modu, MWg, Neonode, Nokia, O2, Oppo, Palm, Pantech, Philips, Posh, Qtek, Samsung, Sewon, Spice, Tel.Me., Thuraya, Unnecto, verykool, VK,  Mobile, Wiko, XCute, XOLO, ZTE,  Alcatel , Asus, Benefon, BenQ-Siemens, Lima, Maxx, Onida, Sansui , Colors, Salora, Simmtronics, Swingtel, Videocon, VOX, Wynncom, Zync, BSNL, BQ, Adcom, A & K, cloudfone, Torque, 100+, 3Q, 78point, Acer, Allview, Amazon, Apple iPhone , iPad, Bartec Pixavi, Blackview, Bluboo, BungBungame, Caterpillar, Chuwi, Colorfly, Conquest, BlackBerry, Bosch, Cat, Chea, Emporia, Eten, Garmin-Asus, Gionee, HP, Huawei, i-mobile, Innostream, Jolla, Kyocera, Lenovo, Maxon, Meizu, Microsoft, Mitsubishi, Motorola, NEC, NIU, Nvidia, OnePlus, Orange, Panasonic, Parla, Plum, Prestigio, Sagem, Sendo, Sharp, Sonim, T-Mobile, Telit, Toshiba, Vertu, vivo, Vodafone, WND, Xiaomi MI, Yezz, YU, Myphone, Infocus , Cherry Mobile, Generic, iBall, THL, Starmobile , Cloudone, RCA, 5ive, Galaxy, inDigi, K-touch, Cheers, Datawind, Digimac, DiYi, Forme, GFive, Hitech, HPL, i-smart, Jivi, Lemon, Kenxinda, M-Tech, Coolpad, Cube, Cubot, Dakele, Daway, DEXP, Digoor, Doogee, Doov, Ecoo, Effire, Elephone, Energy Sistem, Eton, Explay, Faea, Fly, General Mobile, Goclever, Goophone, Haipai, Hasee, Highscreen, HiSense, iBerry, iMan, iNew, Innos, iNo Mobile, Intex, iOcean, IUNI, Jiake, JiaYu, Kazam, KingSing, KingZone, Kodak, Kogan, Kolina, Landvo, Laude, Leagoo,  Leotec, LeTV,  Lumigon, Mann, Manta, Mediacom, Mijue, Mlais, Mogu, MPIE, Mstar,  Neken, Neo, Newman, Nibiru, No.1,  O+, Obi worldphone, Onda, Orgtec, Orientphone, Otium, Oukitel, Phicomm, PiPO, Polaroid, Q-Mobile, QMobile, Qumo, Ramos, Revo, Runbo, Saygus, Senseit, Siswoo, SK-Phone, Smartisan, Sony Ericsson, Subor, TCL, Teclast, Tengda, Texet,  Tianhe, Turbo, Ulefone, UMi, Uniscope, Unistar, Vaio, ViewSonic, Vifocal, VKworld, Voto, Voyo, Vtel, Walton, Wexler, Wickedleak, Wico, Yota Devices, Zeaplus, Zopo.
You can perform this tips and tricks on Android versions 2.1 Eclair, 2.2 Froyo, 2.3 Gingerbread,  3.0 Honeycomb,  Ice cream sandwich 4.0, Jelly bean 4.1 4.2 4.3, 4.4 Kitkat, 6.0 Marshmallow and V5.1 Lollipop +. Let us know if you have any suggestions or any other tips and tricks to make the phone faster.

Sunday, February 22, 2015

Android 4.3 Google Edition Camera App [ No Root Required]

Here's the camera (and gallery) app from the Google Edition phones, which lets you record and view Photosphere images. The UI has been modified!

It works perfectly on Jelly Bean 4.1.2 and 4.2.2, many users have also reported that it works on ICS also.


Instructions :-

  • Just install this as a normal apk , download the file and copy it in you phone and install it ( No Root is required).
  • It is also recommended to backup your old camera app.
  • This app wont delete your existing camera app.

Here is the Download Link - Click Here

Screenshots :-


Enjoy, If you have any problem feel free to comment

How to Install ClockworkMod Recovery (CWM) on Sony Xperia P [ICS and JB]


What is CWM? For taking Nandroid Backups, flashing zip files, if you caught in bootloops due to something wrong flashed WITHOUT backup of your important data, you can go for backup in TAR format from CWM Recovery and later on, extract the tar data and put in Titanium Backup to get it back... (YOU CAN'T USE WHOLE BACKUP THAT HAVE BEEN TAKEN AFTER BOOTLOOPS)

Thanks to atis112 for the Recovery. 

Disclaimer : I am not responsible if you brick your phone or if u make any other damage to your phone

Note : This works on both locked and unlocked bootloader devices!!!
  
REQUIREMENTS  :-
1. Stock ICS / JellyBean ROM
2. Root (Instructions to Root Jelly Bean Click Here)

INSTRUCTIONS :- 
1. Download this zip package - CWM Recovery 6.0.1.2
2. Extract the zip file.
3. Enable USB debugging from Settings > Developer Options.
4. Enable Unknown sources from Settings > Security
5. Connect your phone to your Computer.
6. Click on install.bat and follow the onscreen instructions.

HOW TO USE :-  
1. Power Off your Phone.
2. Power On your Phone. 
3. Press the Volume Down Button when you see the Sony Logo ( Tap the Volume Down 2-3 Times ) 

Source - LINK

How to Root Sony Xperia Z1 ( C6902 / C6903 / C6906 / C6943 ) 4.4.4 KitKat Build [14.4.A.0.157]


Sony released a new update for Xperia Z1 Build 14.4.A.0.157 with some bug fixes aand here is the tutorial to root the latest firmware :D . This tutorial is only for Build 14.4.A.0.157 , will work on all models of Xperia Z1 i.e C6902, C6903, C6909, C6943 :)

To Root any older Build version of Xperia Z1 CLICK HERE

Disclaimer : I am not responsible if you brick your phone or if u make any other damage to your phone

So Lets Start :
1. First make sure you are running KitKat 4.4.4 Build 14.4.A.0.157. Go to Settings > About to verify this. The below screenshot is of C6902 but the method will work on all models of Z1 running Build
14.4.A.0.157.

2. Download and install Flashtool from here - http://www.flashtool.net/downloads.php

3. Download these three files ( See this screenshot first - http://i.imgur.com/DgoqOIA.png )
4. Copy C690X_14.4.A.0.108_KernelOnly.ftf and  C690X_14.4.A.0.157_KernelOnly.ftf  to C:\Flashtool\firmwares

5. Run Flashtool and Flash C690X_14.4.A.0.108_KernelOnly.ftf ( See the screenshots below ) Press Volume down button and connect your phone to connect in Flash Mode.


6. Close Flashtool ( DO NOT SKIP THIS STEP ) 

7. Boot your device , and Connect Your Device to PC with USB Debugging Mode On , go to Settings > Developer Options to enable it. Also Enable Unknown Sources. Go to Settings > Security and check Unknown sources.

8. Extract rootkitXperia_20140719.zip and execute install.bat , the rooting process will start and your device will reboot ( For more instructions on this step refer this - http://www.waledacdroid.com/2014/11/how-to-root-sony-xperia-z1-c6902-c6903.html

9. Now Power Off your phone and Flash the C690X_14.4.A.0.157_KernelOnly.ftf using Flashtool. Press Volume Down button and connect your phone to PC to connect in Flashmode.


10. Wait for flashing to finish , disconnect your phone from PC and boot your phone.

THATS IT YOUR PHONE IS NOW ROOTED.
 
Note : This method works on both locked and unlocked bootloader devices!!! 
 
If you have any problems feel free to comment :)

How to Root / Unroot Xiaomi Redmi 1S ( armani ) running Android Jelly Bean 4.3 ( MIUI 5 - MIUI-JHCMIBH45.0 )

Here is the tutorial for rooting and unrooting Xiaomi Redmi 1S running Android Jelly Bean 4.3 , MIUI 5 - MIUI-JHCMIBH45.0


Disclaimer : I am not responsible if you brick your phone or if u make any other damage to your phone  

You can use the same method to root any other older version also :)

Rooting :

1. First make sure you are running the same build i.e Android 4.3 , MIUI Version : MIUI-JHCMIBH45.0. Goto Settings > About to verify this.


2. Download this File - update.zip and copy it to the root of your Internal Storage.

3. Enable USB Debugging , Go to Settings > About phone and tap 5 times on Android Version to enable Developer option.

4. Reboot your phone to Recovery ( Open Updater app from Tools , Press the Menu / Options button and select Reboot to Recovery mode )


5. Now Select and confirm "Install update.zip to System" , this will take a few seconds. ( Use the Volume Up / Down to navigate and the Power Button to Select )


6. Now select and confirm Reboot. ( Reboot to System )

7. Open Security App , Select Permissions and Turn On the Root permission


THATS IT YOUR PHONE IS NOW ROOTED.


UnRooting :

1. Download this File - UnRoot Redmi 1S.zip , rename it to update.zip and copy it to the root of your Internal Storage.

2. Open Security App , Select Permissions and Turn OFF the Root permission


3. Reboot your phone to Recovery ( Open Updater app from Tools , Press the Menu / Options button and select Reboot to Recovery mode )

4. Now Select and confirm Install update.zip to System , this will take a few seconds.

5. Now Select and confirm Reboot. ( Reboot to System )

YOUR PHONE IS NOW UNROOTED. 
  

If You Have Any Problems Feel Free To Comment :)

Saturday, February 21, 2015

How to Install Custom Dual Recovery ( TWRP and PhilZ Touch and ClockwordMod (CWM) ) on Sony Xperia Z1

This post will guide to you install Custom Recovery on your Xperia Z1 ( C6902, C6903, C6909, C6943 )


The recovery is Dual Recovery and includes  PhilZ Touch 6.48.4 , CWM 6.0.5.0 and TWRP 2.7.1.0

Thanks to [NUT] for the Recovery 

This recovery is only for Xperia Z1 do not try it on any other phone. If you want to install Custom Recovery on any other Sony Z series phone just comment your model , I can provide you with the files :)

Disclaimer : I am not responsible if you brick your phone or if u make any other damage to your phone

Note : This works on both locked and unlocked bootloader devices!!! 
   
REQUIREMENTS  :-
1. Xperia Z1 running Android KitKat
2. Root (Instructions to Root KitKat Build 14.4.A.0.157 , Click Here)

 INSTRUCTIONS :- 
1. Download this zip package - XZDualRecovery
2. Extract the zip file.
3. Enable USB debugging from Settings > Developer Options.
4. Enable Unknown sources from Settings > Security
5. Connect your phone to your Computer.
6. Click on install.bat  ( CMD window will open , see below screenshot )


7. Now Press 1 and hit Enter , where it says Please choose install action. The installation will begin , you will be asked to grant Super User permissions in your mobile , Select Grant


HOW TO USE :-  
1. Power Off your Phone.
2. Power On your Phone. 
3. Press the Volume Down Button for TWRP and Volume Up Button for PhilZ Touch, when you see the Sony Logo and Green Notification Light
4. Also you will see an app named NDR Utils in the app drawer, you can use that to boot into recovery. 
 
If you have any problems feel free to comment :)  

 =-=-=-=-=-= Waledac Oxana  =-=-=-=-=-=

Friday, January 17, 2014

Samsung version 4.3 နဲ႔အထက္ျမန္မာစာမွန္ေစဖို႔ Font dot bat file


ပံု(၇)
4.3 Sammy..
-just unzip n run installer.bat will
-inject mm font
-inject mm kb
-enable mm language
-both installer can flash one by one until ya pin correct
- for pre rooted rom just install from preroot one
-for normal root eg cf root..just install from normal one..
Download http://pc.cd/h90 & http://pc.cd/ge0
Credit To Kyaw Swar Thwin (Moriba) & Djjoe Man


♦ Credit to: http://www.myanmarmobilesoftwaredeveloper.com/?p=9774

ဖုန္း Screen ကို Video ႐ိုက္ေပးမယ့္ အလြန္လန္းတ့ဲ Screen Video Recorder apk(Root User Only)


image
Android သမားမ်ား ေဆာင္ထားသင့္ပါတယ္။  အစကေတာ့ ဒီApp ေလးကုိ ခရစၥမတ္ေန႔ၾကမွ လက္ေဆာင္အျဖစ္ တင္ေပးမလို႔ပါပဲ။ အခုေတာ့ ခရစၥမတ္ အႀကိဳ လက္ေဆာင္အျဖစ္ MMSD ရဲ႔ ေဘာ္ေဘာ္ေတြကို တင္ေပးလိုက္ပါျပီ။ ဒီ App ေလးဟာ ကြ်န္ေတာ္တို႔ Android ဖုန္းေတြမွာ Screen Shot ႐ိုက္သလိုမ်ိဳး Video ႐ိုက္လို႔ရတ့ဲ App ေလးပါ။ နမူနာ အျဖစ္ ကြ်န္ေတာ္ Video ေလးပါတင္ေပးလိုက္ပါတယ္။
Click to view video.
ေအာက္ကလင့္မ်ားမွာ ႏွစ္သက္ရာလင့္မွ ေဒါင္းယူႏိုင္ပါတယ္။
Link 1 (Google Play Store)
or
Link 2(Dropbox) 6.3MB
or
Link 3 (Box) 6.3MB


♣ Credit:  http://www.myanmarmobilesoftwaredeveloper.com/?p=9418

ဖုန္းအားလုံးအတြက္ GMail,Gtalk,Playstore သြင္းရန္ APK မ်ားစုစည္းမူ

Android 4.0 ကေန 4.2.2 အထိ ေကာင္းေကာင္းအလုပ္လုပ္မဲ့ Gmail,Gtalk,Playstore
သြင္းမဲ့
Apk မ်ားျဖစ္ပါတယ္။

4.0 MMSD Gapp Installer


Screenshot - 11_21_2013 , 4_26_50 PM

ဒီ Apk ေလးကေတာ့ Android version 4.0 ကေန 4.0.4 အထိ Gmail,Gtalk,Playstore
သြင္းတဲ့ Apk ေလးပါ။ လုိအပ္ခ်က္ေတြကေတာ့ မိမိ ဖုန္းကုိ Root ေဖာက္ထားဖုိ႕လုိအပ္ပါတယ္။
Original မပါတဲ့ ဖုန္းမ်ားတြင္သာသံုးရန္ အၾကံေပးပါတယ္။

PlayStore ကေန အဆင္ေျပသူမ်ား ေဒါင္းေပးပါ။

Rate 5 Star နဲ႕ Review ေလးပါေရးေပးပါအုံး =D
https://play.google.com/store/apps/details?id=com.phyochan.foutzerogappinstaller

Playstore မလြယ္သူမ်ား ဒီမွာေဒါင္းပါ။

http://www.mediafire.com/download/j8sbpfcjvqs3cbi/4.0%20MMSD%20Gapp%20Installer.apk


4.1.2 MMSD Gapp Installer

Screenshot - 11_30_2013 , 12_25_15 PM

ဒီ Apk ေလးကေတာ့ Android version 4.1 ကေန 4.1.2 အထိ Gmail,Gtalk,Playstore
သြင္းတဲ့ Apk ေလးပါ။ လုိအပ္ခ်က္ေတြကေတာ့ မိမိ ဖုန္းကုိ Root ေဖာက္ထားဖုိ႕လုိအပ္ပါတယ္။
Original မပါတဲ့ ဖုန္းမ်ားတြင္သာသံုးရန္ အၾကံေပးပါတယ္။

PlayStore ကေန အဆင္ေျပသူမ်ား ေဒါင္းေပးပါ။

Rate 5 Star နဲ႕ Review ေလးပါေရးေပးပါအုံး =D
https://play.google.com/store/apps/details?id=com.phyochan.fouronetwogappinstaller

Playstore မလြယ္သူမ်ား ဒီမွာေဒါင္းပါ။

http://www.mediafire.com/download/szjhp426d7q2b8r/412mmsdgappinstaller.apk


4.2.1 MMSD Gapp Installer


Screenshot - 11_30_2013 , 12_29_32 PM

ဒီ Apk ေလးကေတာ့ Android version 4.2 ကေန 4.2.2 အထိ Gmail,Gtalk,Playstore
သြင္းတဲ့ Apk ေလးပါ။ လုိအပ္ခ်က္ေတြကေတာ့ မိမိ ဖုန္းကုိ Root ေဖာက္ထားဖုိ႕လုိအပ္ပါတယ္။
Original မပါတဲ့ ဖုန္းမ်ားတြင္သာသံုးရန္ အၾကံေပးပါတယ္။

PlayStore ကေန အဆင္ေျပသူမ်ား ေဒါင္းေပးပါ။

Rate 5 Star နဲ႕ Review ေလးပါေရးေပးပါအုံး =D
https://play.google.com/store/apps/details?id=com.phyochan.fourtwoonegapp

Playstore မလြယ္သူမ်ား ဒီမွာေဒါင္းပါ။
http://www.mediafire.com/download/6npqlhh6qj1589d/4.2.1%20MMSD%20Gapp%20Installer.apk


♠ Credit: http://www.myanmarmobilesoftwaredeveloper.com/?p=9321

4.2.1 MMSD Google App Installer


Screenshot - 11_28_2013 , 9_54_16 AM


Screenshot_2013-11-26-17-09-40


Screenshot_2013-11-26-17-09-49


Screenshot_2013-11-25-11-49-16

Screenshot_2013-11-25-11-50-01
Android version 4.2.1 အတြက္ Google App သြင္းလို႕ရတဲ့ Apk ေလးကုိ

MMSD ကေန Free မွ်ေ၀လုိက္ပါတယ္။

ဒီ APK မွာပါတဲ့ Function ႏွစ္ခုကေတာ့ Delete Now နဲ႕ Install Now ပါ။

Delete Now ကေတာ့ Android version 4.0 ေက်ာ္ရင္အသုံးျပဳလုိ႕ရမည္ျဖစ္ျပီး

ဒီ Function ကုိအသုံးျပဳကာ ဖုန္းအတြင္းထည့္သြင္းထားေသာ Google App မ်ားကုိ ျပန္လည္ဖ်က္လုိ႕ရပါတယ္။
မည့္သည့္ Google App Installer မ်ားျဖင့္သြင္းထားျပီး Error တက္ေနရင္ ဒီ Function နဲ႕ Error ရွင္းႏုိင္ပါတယ္။

Install Now ဆုိတဲ့ Function ကေတာ့ Android version 4.1 မွာသာ အသုံးျပဳႏုိင္ျပီး

Gmail,Gtalk, နဲ႕ Google Playstore မ်ားကုိသြင္းႏုိင္ပါတယ္။

14Mb သာသာ ရွိတဲ့ Apk ေလးျဖစ္တဲ့အတြက္အသုံးျပဳရလြယ္ကူပါတယ္။

ဒီ App ကုိအသုံးျပဳရန္အတြက္ Android version 4.0 နဲ႕အထက္ရွိရပါမယ္။

ဒီ App ကုိတုိက္ရုိက္ေဒါင္းရန္အတြက္ Google Play Store ကေနေဒါင္းယူႏုိင္ပါတယ္။

Playstore က ေဒါင္းယူျခင္းျဖင့္ကူညီပါအုံး =D

Playstore မွာေဒါင္းယူျပီး Rate 5 Stars ေလးေပးပါအုံးခင္ဗ်ာ။

ဒီမွာေဒါင္းပါ။


https://play.google.com/store/apps/details?id=com.phyochan.fourtwoonegapp

Play Store ေပၚကေန မေဒါင္းႏုိင္သူမ်ား ဒီမွာေဒါင္းပါ =D

http://www.mediafire.com/download/6npqlhh6qj1589d/4.2.1%20MMSD%20Gapp%20Installer.apk


♣ http://www.myanmarmobilesoftwaredeveloper.com/?p=9253

4.0 MMSD Gapp Installer(Android 4.0 မွ 4.0.4 အထိ Gtalk,Gmail,Playstore သြင္းရန္)


Screenshot_2013-11-21-14-08-55


Screenshot_2013-11-21-13-37-04


Screenshot_2013-11-21-13-37-17


Screenshot_2013-11-21-13-37-27


Screenshot_2013-11-21-13-37-31


Screenshot_2013-11-21-13-37-11
Android version 4.0 ကေန 4.0.4  အတြက္ Google App သြင္းလို႕ရတဲ့ Apk ေလးကုိ

MMSD ကေန Free မွ်ေ၀လုိက္ပါတယ္။

ဒီ APK မွာပါတဲ့ Function ႏွစ္ခုကေတာ့ Delete Now နဲ႕ Install Now ပါ။

Delete Now ကေတာ့ Android version 4.0 ေက်ာ္ရင္အသုံးျပဳလုိ႕ရမည္ျဖစ္ျပီး

ဒီ Function ကုိအသုံးျပဳကာ ဖုန္းအတြင္းထည့္သြင္းထားေသာ Google App
မ်ားကုိ ျပန္လည္ဖ်က္လုိ႕ရပါတယ္။
မည့္သည့္ Google App Installer မ်ားျဖင့္သြင္းထားျပီး Error တက္ေနရင္ ဒီ Function နဲ႕
Error ရွင္းႏုိင္ပါတယ္။

Install Now ဆုိတဲ့ Function ကေတာ့ Android version 4.0 မွ 4.0.4 အထိသာ
အသုံးျပဳႏုိင္ျပီး

Gmail,Gtalk, နဲ႕ Google Playstore မ်ားကုိသြင္းႏုိင္ပါတယ္။

10Mb သာသာ ရွိတဲ့ Apk ေလးျဖစ္တဲ့အတြက္အသုံးျပဳရလြယ္ကူပါတယ္။

ဒီ App ကုိအသုံးျပဳရန္အတြက္ Android version 4.0 နဲ႕အထက္ရွိရပါမယ္။

ဒီ App ကုိတုိက္ရုိက္ေဒါင္းရန္အတြက္ Google Play Store ကေနေဒါင္းယူႏုိင္ပါတယ္။

Playstore က ေဒါင္းယူျခင္းျဖင့္ကူညီပါအုံး =D

Playstore မွာေဒါင္းယူျပီး Rate 5 Stars ေလးေပးပါအုံးခင္ဗ်ာ။

ဒီမွာေဒါင္းပါ။
https://play.google.com/store/apps/details?id=com.phyochan.foutzerogappinstaller

Play Store ေပၚကေန မေဒါင္းႏုိင္သူမ်ား ဒီမွာေဒါင္းပါ =D

http://www.mediafire.com/download/j8sbpfcjvqs3cbi/4.0%20MMSD%20Gapp%20Installer.apk


• http://www.myanmarmobilesoftwaredeveloper.com/?p=9136

Samsung SCH-I619 Root လုပ္လို႔ရၿပီ ။ Root Master.apk


image
ဖုန္းထဲမွာတင္ Root လုပ္လို႕ ရတ့ဲ apk ေတြေတာ္ေတာ္မ်ားမ်ား စမ္းၾကည့္ဖူးပါတယ္။
တခ်ိဳ႕ apk ေတြက တကယ္ အလုပ္မလုပ္ပါဘူး။
ဒီ apk ေလးကိုလည္း အစကေတာ့ အထင္မႀကီးပါဘူး။
ဒါနဲ႕ Huawei G-520 Jelly Bean မွာ စမ္းလိုက္တာ ခ်က္ခ်င္း အဆင္ေျပတယ္ဗ်ာ။ 5 မိနစ္ေတာင္ မၾကာလိုက္ပါဘူး။
ဒါနဲ႕အဆင္ေျပတယ္ဟဆိုၿပီး Samsung SCH-I619 (CDMA) GINGERBREAD ဖုန္းေလးမွာစမ္းေတာ့လည္း အဆင္ေျပျပန္ေရာဗ်ာ
ဒါနဲ႕အရမ္းေကာင္းတာပဲဆိုၿပီး MMSD ရဲ႕ ေဘာ္ေဘာ္ေတြကို ေပးလိုက္ပါတယ္ ။
တ႐ုတ္စာေတြနဲ႕မို႔ APK ရဲ႕နာမည္ကို မသိပါဘူး။ ( ဖတ္မွ ဖတ္တတ္တာကိုး :D ) ဒါေၾကာင့္ Root Master လို႔ ကိုယ့္ဟာကို နာမည္ေပးလိုက္တယ္ :D
ကဲ ေလေၾကာရွည္သြားၿပီ။
ေအာက္ကလင့္မွာေဒါင္းပါခင္ဗ်ာ
Box Link မွေဒါင္းရန္
Dropbox Link မွေဒါင္းရန္


○ Credit: http://www.myanmarmobilesoftwaredeveloper.com/?p=9096

Android 4.1 အထက္ေတြအကုန္ ျမန္မာစာမွန္ေအာင္လုပ္လုိ႕ရျပီ။


Screenshot - 11_12_2013 , 5_01_12 PM


Android 4.1 နဲ႕အထက္ ေတြျမန္မာစာမွန္ေအာင္ ဒီနည္းအတုိင္းလုပ္ေဆာင္နုိင္ပါျပီ။

MMSD Smart Zawgyi v1.3.1 ကေတာ့ Orient Myanmr Font ကုိအေျခခံထားတာပါ။
မည့္သည့္ေဖာင္ Changer နဲ႕ထည့္ထည့္ျမန္မာစမေပၚေသာ Y511
0 ေတြေပၚေပၚေနတက္ေသာ G610, Y320 တုိ႕အျပင္
Samsung,Sony,Huawei,HTC,imobile ႏွင့္မည္သည့္ Model မဆုိအသုံးျပဳႏုိင္ပါတယ္။
Android version 1.6 ကေန 4.4 အထိအသုံးျပဳႏုိင္ျပီး
Android 4.1 နဲ႕အထက္ေတြမွာအသုံးျပဳမယ္ဆုိရင္ အရင္ ေဇာ္ဂ်ီထက္ ပုိမုိျမန္မာစာမွန္ပါတယ္။
Android App ျဖစ္သည့္အတြက္ ဖုန္းအတြင္းထည့္သြင္းအသုံးျပဳရန္လုိအပ္ပါသည္။
မိမိဖုန္းအား Root ေဖာက္ထားရန္လုိအပ္ပါသည္။
Google Playstore ကေန ေဒါင္းေလာ့ဆြဲျခင္းျဖင့္ကူညီပါ။
Vote ေလးပါေပးခဲ့အုံးေနာ္။
https://play.google.com/store/apps/details?id=com.phyochan.smartzawgyi
Playstore မရွိသူမ်ားဒီကေဒါင္းပါ။
http://www.mediafire.com/download/9c93g8ozbgc2b5z/MMSD_Smart_Zawgyi_v1.3.1.apk
ဒီ Font Changer နဲ႕ခ်ိန္းျပီးရင္ ဒီဖုိင္ေလးကုိေဒါင္းလုိက္ပါ။
http://www.mediafire.com/download/xp4fuss4xygax54/fepfz(MMSD).apk
ျပီးရင္ Patch & Reboot ကုိ ႏွိပ္လုိက္ပါ။ ျမန္မာစာလုံး၀မွန္ပါျပီ။


• Credit: http://www.myanmarmobilesoftwaredeveloper.com/?p=9062

MPT Service v1.1(BETA) (ျမန္႕မာဆက္သြယ္ေရး၀န္ေဆာင္မူ႕)


Screenshot_2013-11-01-11-53-59

Screenshot_2013-11-01-11-54-05


Screenshot_2013-11-01-11-55-17


Screenshot_2013-11-01-11-54-44

Screenshot_2013-11-01-11-55-47


MPT Service v1.1(Beta) ေလးကေတာ့ အရင္ v1.0.2 မွာ
နယ္ေတြမွာ ျဖစ္တက္တဲ့ျပသနာေလးေတြကုိေျဖရွင္းေပးထားပါတယ္။
၇၃ ေတြေငြျဖည့္ရင္တက္တဲ့ Error မ်ားကုိလဲေျဖရွင္းေပးထားပါတယ္။
ဒီApp ေလးရဲ႕ Featured ေတြကေတာ့

- GSM,CDMA လက္က်န္ေငြစစ္ႏုိင္ျခင္း
- GSM,CDMA ေငြျဖည့္ႏုိင္ျခင္း
- GSM Internet ေလွ်ာက္ထားႏုိင္ျခင္း
- GSM အခ်င္းခ်င္း ေငြျဖည့္ေပးႏုိင္ျခင္း
- GSM Internet Setting ခ်ိန္နည္းထည့္သြင္းေပးထားျခင္း
- Voice Mail ေလွ်ာက္ထားႏုိင္ျခင္း
-Call Waiting ေလွ်ာက္ထားႏုိင္ျခင္း စသည္တုိ႕လုပ္ေဆာင္ႏုိင္ပါတယ္။
ျမန္မာလုိအညြန္းပုိင္းမ်ားစြာထည့္သြင္းေပးထားပါတယ္။

သတိေပးခ်င္တာကေတာ့ Internet ေလွ်ာက္ျပီးသားဖုန္းေတြ ထပ္ျပီးေတာ့
Internet ေလွ်ာက္ရန္ကုိမႏွိပ္မိပါေစနဲ႕။
မွားႏွိပ္လုိ႕ ၁ေသာင္းထပ္ျဖတ္ခံရလွ်င္ တာ၀န္ယူမွာမဟုတ္ပါဘူး
သတိေပးခ်က္ေပါင္းမ်ားစြာလဲထည့္သြင္းေပးထားလုိ႕
အဆင္ေျပေျပအသုံးျပဳႏုိင္မယ္ထင္ပါတယ္။
Playstore မွာသြားေရာက္ေဒါင္းႏုိင္ပါတယ္။
Vote လုပ္ျပီးအားေပးပါအုံးေနာ္ =D

https://play.google.com/store/apps/details?id=com.phyochan.mptservice

Play Store မရွိသူမ်ားဒီကေဒါင္းပါ။

http://www.mediafire.com/download/ed946qpyjp605ow/MPT_Service_1.1(Beta).apk

◘ Credit: http://www.myanmarmobilesoftwaredeveloper.com/?p=9013